

How To Repair Valve Seal On 21.hp Brigs Intek Engie
Pocket-sized Valve Maintenance & Repair
Valves control the flow of fuel vapor into the combustion bedroom and the menstruation of exhaust gases leaving the engine. Faulty or dirty valves may stick and can develop pits, cracks or grooves that crusade the engine to lose power and fuel efficiency.
Whether y'all're having trouble with your engine or wanting to go through your routine valve maintenance, brand sure you lot have our pace-by-step guide on how to bank check your engine valves. From removing the valve, to cleaning for inspection, detect data for valve maintenance for your Briggs & Stratton engines.
![]() WARNING: Always read the engine and equipment manual(south) before starting, operating, or servicing your engine or equipment to avert personal injury or property damage. Come across an authorized dealer or contact Briggs & Stratton if you are unsure of any procedure or take additional questions. Find all Engine Safety Warnings.
WARNING: Always read the engine and equipment manual(south) before starting, operating, or servicing your engine or equipment to avert personal injury or property damage. Come across an authorized dealer or contact Briggs & Stratton if you are unsure of any procedure or take additional questions. Find all Engine Safety Warnings.
If you're looking for a specific solution or step into valve repair, jump downward to the department for stride-by-step instructions.
How to Remove Small Engine Valves for Inspection
How Do I Check or Repair My Engine Valves?
Valve Maintenance: Lapping Valves
Re-installing Valves
Adjusting Tappet Clearances & Overhead Valves
Before you can service or repair the valves, you need to remove the engine components that interfere with the engine valve.

How to Remove Engine Valves for Inspection
In gild to properly inspect your engine valves for maintenance or repair, you need to remove them from the engine. Find the type of engine valve retainer and follow our step-by-step guide below
How to Reach The Valve Sleeping accommodation
NOTE: Always wear safety eyewear when removing and installing valves.
- Step ane: Remove the spark plug and securing the spark plug pb away from the spark plug.
- Step two: Remove the muffler, crankcase breather and any other components that block admission to the valve chamber.


- Footstep 3: Remove the cylinder caput bolts and have out other bolts from the engine components to reach the valve chamber. Characterization the bolts if necessary, to ensure proper installation later on, since they may be of unlike lengths.

Removing Valves: Automotive Type or Pin Retainers
- Pace 1: Remove the spark plug and securing the spark plug pb abroad from the spark plug.
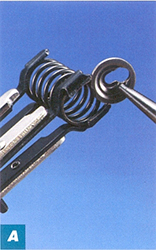
- Step two: Subsequently removing the spark plug and securing the spark plug atomic number 82 abroad from the spark plug, adapt the jaws of the valve spring compressor (office number 19063) until they touch on the peak and lesser of the valve chamber

- Step 3: Button the tool in until the upper jaw slips over the upper end of the spring. Tighten the jaws to compress the spring

Footstep 4: Remove the retainers and lift out the valves, compressors and springs.
Removing Valves: Keyhole Retainers
Removing the valves for keyhole retainers requires some patience. Call back that the retainer's primal-shaped slot volition help you skid the servant off the valve stem, even when the servant is hidden from your view by the valve spring compressor.
- Footstep 1: Remove the spark plug and securing the spark plug pb away from the spark plug.
- Step ii: Sideslip the upper jaw of the valve jump compressor over the top of the valve chamber and the lower jaw between the spring and retainer. If the engine design does non permit the upper jaw to fit over the pinnacle of the valve chamber, insert the upper jaw into the chamber over the peak of the spring, so that the bound is between the tool's jaws
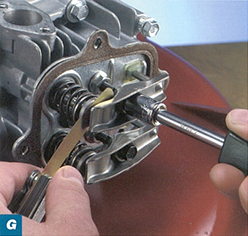
- Footstep 3: Rotate the handle on the valve spring compressor clockwise to shrink the spring. Then, slide the retainer off the valve by shifting it with needle nose pliers and so that the large part of the keyhole is directly over the stem. Use the pliers to remove the retainer from the valve chamber.
- Step 4: With the valve spring compressor clamping the leap, remove the tool and jump from the bedchamber. Then, slowly crank open the valve spring compressor to release the tension and remove the spring
Removing Overhead Valves
Overhead valve designs vary from one engine model to another. The parts and servicing steps in your overhead valve cylinder may differ from the approach that follows, which is based on the Briggs & Stratton Intek vi-HP single-cylinder OHV. The Intek does non require the use of a valve spring compressor, making valve removal and installation simple.
- Step 1: Remove the spark plug and securing the spark plug lead away from the spark plug.
- Step 2: Remove the air cleaner assembly, fuel tank, oil fill tube, blower housing and rewind starter, muffler guard, muffler, carburetor and any other engine parts that block access to the cylinder caput.
- Step 3: Remove the screws from the valve cover, using a socket wrench or nut driver.
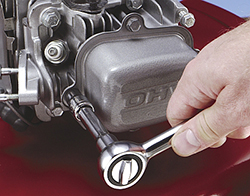
And so, remove the valve cover, breather valve assembly (if equipped) and any gaskets.
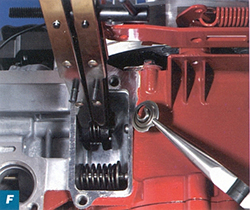
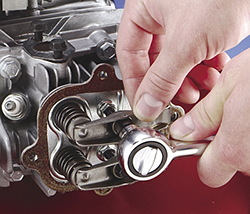
- Step 4: Remove the rocker arm bolts with a socket wrench or nut driver. Then remove the rocker arms and button rods.
- Pace 5: Remove the valve caps (if equipped). They are seated on the valve stems.
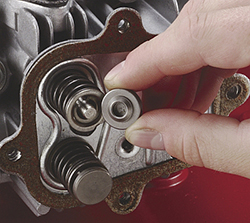
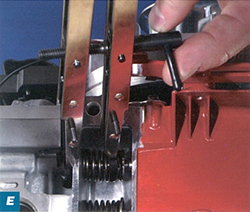
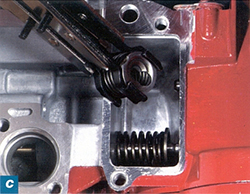
- Step 6: Use your thumbs to press in on the spring servant and valve leap over ane of the valves. With the valve spring compressed, remove the retainer.
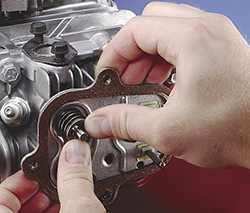
If your engine uses a keyhole retainer, line up the large slot in the retainer with the valves stalk and release the spring slowly so that the stem slips through the large slot. Then, repeat the procedure for the other valve.
- Stride seven: Remove the push button rod guide bolts and push rod guide.
- Step 8: Remove the cylinder caput bolts and remove the cylinder caput past rocking it with your hands. If necessary, loosen the cylinder head by striking it with a nylon-faced hammer. Never pry it loose, as this may harm the caput.
- Step ix: Remove and inspect the valves, guides and seats following the steps below. The intake and frazzle valves often are fabricated of different steel alloys and may be different colors.
How Do I Cheque or Repair My Engine Valves?
Before trying to repair your valves, look them over carefully. Balance on the valves may help you identify a specific engine problem.
Gummy deposits on the intake valve become manus in manus with a subtract in engine functioning, often considering the engine has been run on sometime gasoline. Difficult deposits on either valve suggest called-for oil, which has several possible causes.
Follow the steps below to check for the most probable sources of engine valve problems.
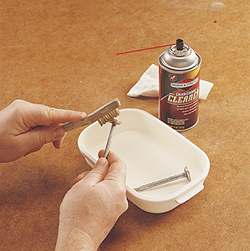
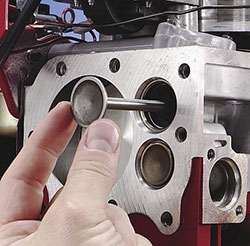
- Pace ane: Cheque the valve confront for an irregular seating pattern. The blueprint effectually the confront should be fifty-fifty with the valve head and of equal thickness all the way around. It there are stubborn deposits, clean the valve with a wire brush and solvent, soaking the parts for several hours if necessary, to loosen hardened grit.
- Step 2: Run a fingernail or credit carte along the valve stem once you take cleaned it. If you lot feel a ridge, the valve stem is worn and should be replaced. The valve guide may as well be worn and in demand of a replacement.
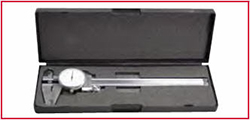
Footstep iii: Measure out the thickness of the valve head, known as the valve head margin, using a caliper (part number 19199).
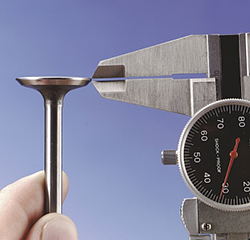
Replace the valve if the margin measures less than 1/64"
- Footstep 4: Examine the surfaces of the valve face up and seat. An uneven wear pattern tells you it's time to replace them or resurface the seat and replace the valve.
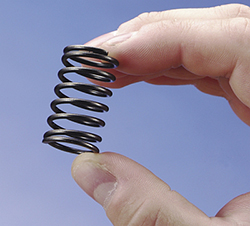
- Step 5: Bank check that both valve springs are straight. Replace either valve spring if information technology is bent.
- NOTE: The exhaust valve spring may apply thicker wire than the intake valve spring.
Valve Maintenance: Lapping Valves
If there are no signs of damage or valves wearing out subsequently inspection, yous tin can tune upward the valves and seats then that the valves seal effectively (also known every bit "lapping the valves").
How to Lap Valves
You tin can smoothen out minor scoring and pitting of the valve face and seat to restore a valve's power to seal the combustion chamber past lapping the valves. While lapping valves, make certain to check your progress often because it'south easy to remove the carbon building besides as the metallic, further dissentious the valve or seat.
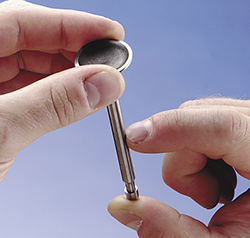
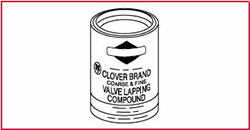
- Step one: Utilize a modest corporeality of valve lapping compound (part number 94150) - a fine, but annoying paste- to the valve face and insert the valve into the valve guide.
- Pace 1: Apply a modest amount of valve lapping compound
- Step 2: Wet the cease of the lapping tool suction loving cup and place it on the valve head. Spin the valve back and forth betwixt your hands several times. Lift the tool, rotate 1/4 turn and spin again.

- Pace 3: Clean the surface ofttimes and check your progress. Lap the valve merely enough to create a consequent and even pattern effectually the valve face.
- Step 4: Once lapping is completed, clean the valves thoroughly with solvent to ensure that ALL of the abrasive balance is removed. Any particles that remain tin can chop-chop damage the valves and other engine components.
Re-installing Valves after Repair & Maintenance
How to Reinstall Valves With Pins Or Automotive-Type Retainers
Notation: Wear safety eyewear while reinstalling valves to protect yourself from the possibility of a flying springs.
- Pace one: Identify the valve spring into the valve spring compressor and rotate the tool's handle until the jump is fully compressed.
- Pace ii: Insert the compressed spring into the valve chamber.
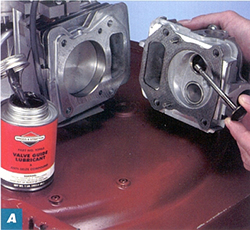
- Step iii: Brush the valve stem with valve stem lubricant
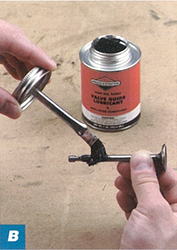
Then, lower the valve stem through the spring.
Hold the spring toward the top of the chamber and the valve in the closed position.
- Step 4: If pins are used, insert each pivot with needle nose pliers. If automotive-blazon retainers are used, place the retainers in the valve stalk groove.
- Step five: Lower the jump until the retainer fits around the pin or automotive-type retainer. Then, pull out the valve spring compressor.
- Pace six: Reinstall the crankcase sabbatical and other engine components.
How to Reinstall Valves With Keyhole Retainers
Again, safety eyewear is absolutely necessary. Retrieve: a spring that is nether tension can popular loose and fly through the air.
- Stride i: Valves with keyhole retainers do not require an additional servant. Compress the keyhole retainer and spring with the compressor tool - the large hole should face the opening in the tool - until the spring is solid.
- Step 2: Brush the valve stem with valve stalk lubricant.
- Step 3: Insert the compressed spring and retainer into the valve chamber
- Footstep four: Insert the valve stem through the large slot in the retainer.

- Step 5: Reinstall the crankcase sabbatical and other components.
How to Reinstall Overhead Valves
- Footstep 1: Check that valve stems and guides are free of debris and burrs. And then, lightly glaze the valve stems with valves guide lubricant and insert them in the cylinder head, taking care to place the correct valve in each valve guide.
- Step 2: Place the push rod guide on the cylinder caput and adhere the mounting bolts, using a torque wrench. Coat the rocker arm stud threads with a hardening sealant and install the rocker arm studs, using a socket wrench.

- Note: Consult your Authorized Briggs & Stratton Dealer for the proper torque settings for the mounting bolts and studs.
- Footstep 3: Lubricate the inside diameter of each valve stem seal (if equipped) with engine oil and install the seals on the valve stems. Printing them into place.
- Step iv: Install a valve leap and servant over each stem.

- Use both thumbs to compress the spring until the valve stalk extends through the large end of the keyhole slot. Check that the retainer is fully engaged in the valve stem groove. Repeat this pace for the other valve.
Step 5: Coat the threads of the cylinder head bolts with valve guide lubricant. Install a new cylinder head gasket on the cylinder, insert the bolts in the cylinder and position the cylinder head on the cylinder. - Step 6: Tighten the cylinder head bolts in increments, using a torque wrench. Turn each commodities a few turns, so go along to the next bolt until each bolt is just snug. And so, for terminal tightening, continue in increments of roughly i-third the last torque.
- Note: Consult your Operator'south Transmission for final torque specifications. Uneven tightening is likely to warp the cylinder caput.
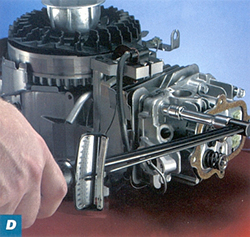
- Step 7: Install the push rods through the push rod guides and into the tappets.
- Type of Push Rod Based on Engine:
Single Cylinder OHV - Model Series 260700, 261700 upper push rod (exhaust) is hollow. Model Serial 28N700, 28Q700, 28U700, 28W700, 287707, 310700, 312700, 313700 frazzle push rod has a red ring of paint for identification and is steel. - Intek V-Twin OHV - Intake button rods are aluminum.
- Vanguard V-Twin - All models (except 540000, 610000) exhaust valve push rods are aluminum. Model Series 540000 and 610000, all push rods aluminum.
- Step 8: Install the caps on the ends of the valves and wipe away any lubricant. Then, install the rocker arm assemblies while holding the rocker arms against the valve cap and push rod.
Installing Rock Arm Assemblies
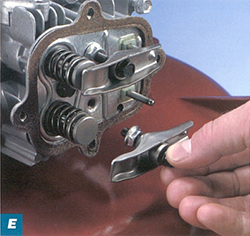
- Footstep 8: Install the caps on the ends of the valves and wipe abroad any lubricant. Then, install the rocker arm assemblies while belongings the rocker arms confronting the valve cap and push rod.
Adjusting Tappet Clearances & Overhead Valves
How to Adjust Tappet Clearances
Since lapping valves removes a small amount of material from the surfaces of the valve face and valve seat, you may need to adjust the tappet clearances - the spacing betwixt the valve stem and the tappet - after lapping and reinstalling the valves. Enquire your Briggs & Stratton Authorized Dealer nigh you lot for the correct tappet clearance for your engine.
Step 1: With each valve installed in its proper guides in the cylinder, plow the crankshaft (clockwise as viewed from the flywheel end of the crankshaft) to acme expressionless center. Both valves should be airtight. Then, turn the crankshaft by top dead centre until the piston is 1/iv" downwards from the tiptop of the cylinder.
Note: This procedure should be repeated for each cylinder on Opposed Twin and V-Twin engines.
Step 2: Bank check the clearance between each valve and its tappet, using a feeler guess
Step 3: If clearance is bereft, remove the valve and grind or file the end of the valve stalk square to increase the clearance. Check the length frequently as it is easy to remove too much metallic.
Pace 4: Once the individual valve parts take been thoroughly cleaned, lubricate the valve stems and guides, using valve guide lubricant. Then, make certain in that location is NO lubricant on the ends of the valve stems or tappets.
How to Adjust Overhead Valves
- Stride ane: Release the brake jump. And so, turn the flywheel to close both valves.
- Step ii: Insert a narrow screwdriver into the spark plug hole and impact the piston. Turn the flywheel clockwise by top dead center until the piston has moved down 1/4". Utilize the screwdriver to gauge the piston'due south range of motion.
- PLEASE NOTE: This process must be performed for each cylinder on V-Twin engines.
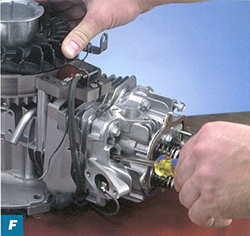
- Step three: Check the valve clearance past placing a feeler gauge between the valve head and the rocker arm. Clearances differ for the two valves and typically range from .002 - .004" to .005 - .007".
- Footstep 4: Adjust the clearances equally required by turning the rocker screw. Once adjustments are completed, tighten the rocker nut.
- Step 5: Install the valve cover, using new gaskets, equally required, and make sure the encompass is secure.

Source: https://www.briggsandstratton.com/eu/en_gb/support/faqs/browse/valve-repair-maintenance.html
Posted by: guidryhandsore.blogspot.com
0 Response to "How To Repair Valve Seal On 21.hp Brigs Intek Engie"
Post a Comment